Implementing FXAA
Table of Contents
When rendering 3D scenes on a computer screen, aliasing can occur. As each pixel can only belong to the specific object covering its area of the screen, and receives a unique color from it, jagged and saw-toothed effects can appear at the edges of such object. The same effects can be seen when there are thin lines (such as wires) displayed.

Fighting aliasing
Multiple anti-aliasing techniques have been developed to mitigate this kind of visual artifacts. Some rely on rendering to a bigger picture to obtain more details from the scene before downsampling and displaying the result on the screen, such as super-sampled anti-aliasing (SSAA). Various refinements to mitigate the performance and memory cost were developed, but are still limited by some constraints. Multi-sampled anti-aliasing (MSAA) is one of those, extremely easy to enable in OpenGL but hard to use in a modern deferred rendering pipeline (where lighting computations are performed in a specific rendering pass).
Other techniques use the information from previous frames to enhance the quality of the current frame, this class of algorithms is called temporal anti-aliasing. Some other methods are post-processing effects applied on the final rendered image. Among those, subpixel morphological anti-aliasing (SMAA) is one of the most state-of-the-art ones, but is quite complex to implement. A much simpler but still extremely efficient algorithm was described by Timothy Lottes from Nvidia in 2009 and has quickly made its way into many games: fast approximate anti-aliasing, FXAA.
Enters FXAA
FXAA is simple to add to an existing renderer: it is applied as a final rendering pass [1] that takes only the rendered image as an input, and output an anti-aliased version. The main idea is to detect edges in the rendered picture and smooth them. This method is fast and efficient but can blur details on textures. I will try to explain step-by-step the algorithm[2], but first, an example.

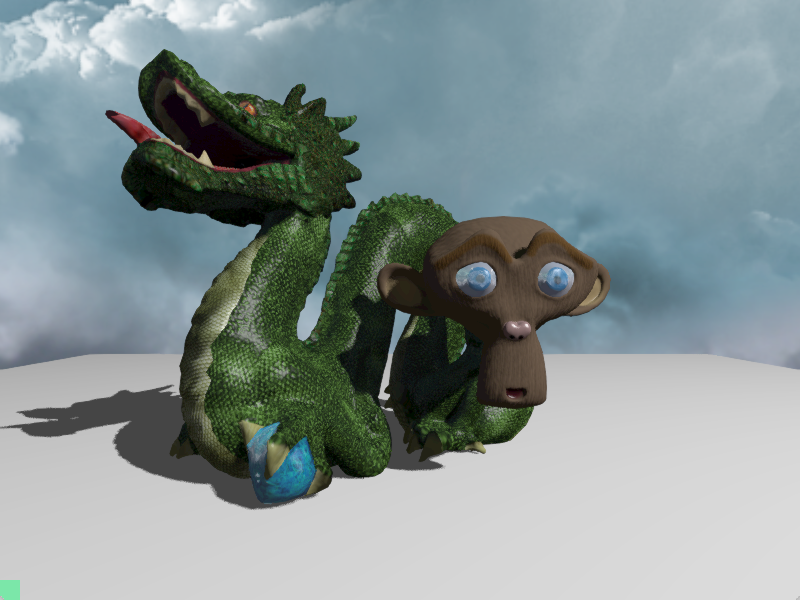
And here is a close-up: when anti-aliasing is enabled, all edges are smoothed, along with some texture details (on the dragon skin in particular).

Prerequisites
For my explanation, I will suppose that the full scene is first rendered into a texture image, at the same resolution than the window. Then a rectangle covering the whole window is rendered displaying this texture. For each pixel of this rectangle, the FXAA algorithm is executed in what is called a fragment shader, a small program executed on the GPU for each pixel.
Luma
Most of the computations in the FXAA shader will rely on the luminosity of the pixels read from the texture, expressed as grey levels between 0.0 and 1.0. For this the luma will be used, defined by the formula L = 0.299 * R + 0.587 * G + 0.114 * B
It is a weighted sum of the red, green and blue components that takes into account the sensibility of our eyes to each wavelength range.
Furthermore we will use its value in perceptual (and not linear) space, and we approximate the inverse gamma transformation[3] by a square root. The following utility function is thus defined in the shader.
float rgb2luma(vec3 rgb){
    return sqrt(dot(rgb, vec3(0.299, 0.587, 0.114)));
}
Texture filtering
To read into a texture in OpenGL, we usually use UV coordinates expressed as floating point numbers in [0,1]. But textures are composed of a finite number of pixels in each dimension, each of these having a constant color; what should happen if one tries to read a color at UV coordinates that fall between two pixels? There are two main ways to handle this:
- determine the nearest pixel, and use its color. This is the nearest neighbor algorithm, shown on the left on the picture below.
- interpolate linearly between the four closest pixels colors, weighted by the distance to each. This is bilinear filtering, displayed on the right.

Note that, when displaying the rendered scene texture in a window of the same size, the filtering method used won't modify the look of it[4]. It will only influence the values read during the FXAA computations, and we will choose bilinear filtering to get free interpolation.
Step-by-step
The only inputs needed are the texture screenTexture, the UV coordinates of the fragment In.uv and the inverse of the size of the window inverseScreenSize (1.0/width, 1.0/height); the only output is a RGB color vector fragColor.
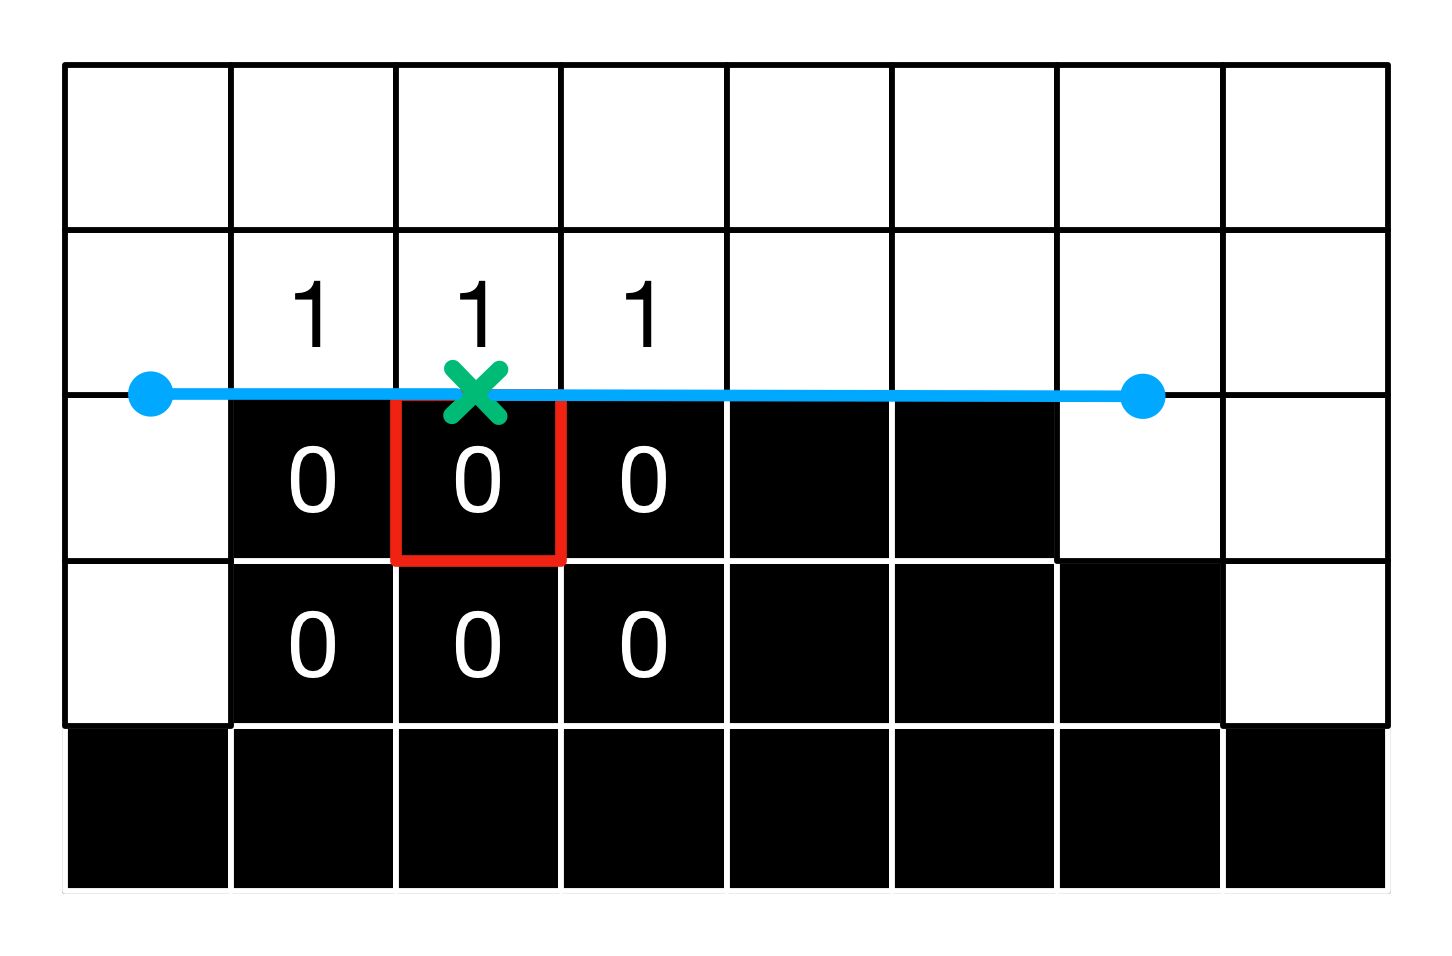
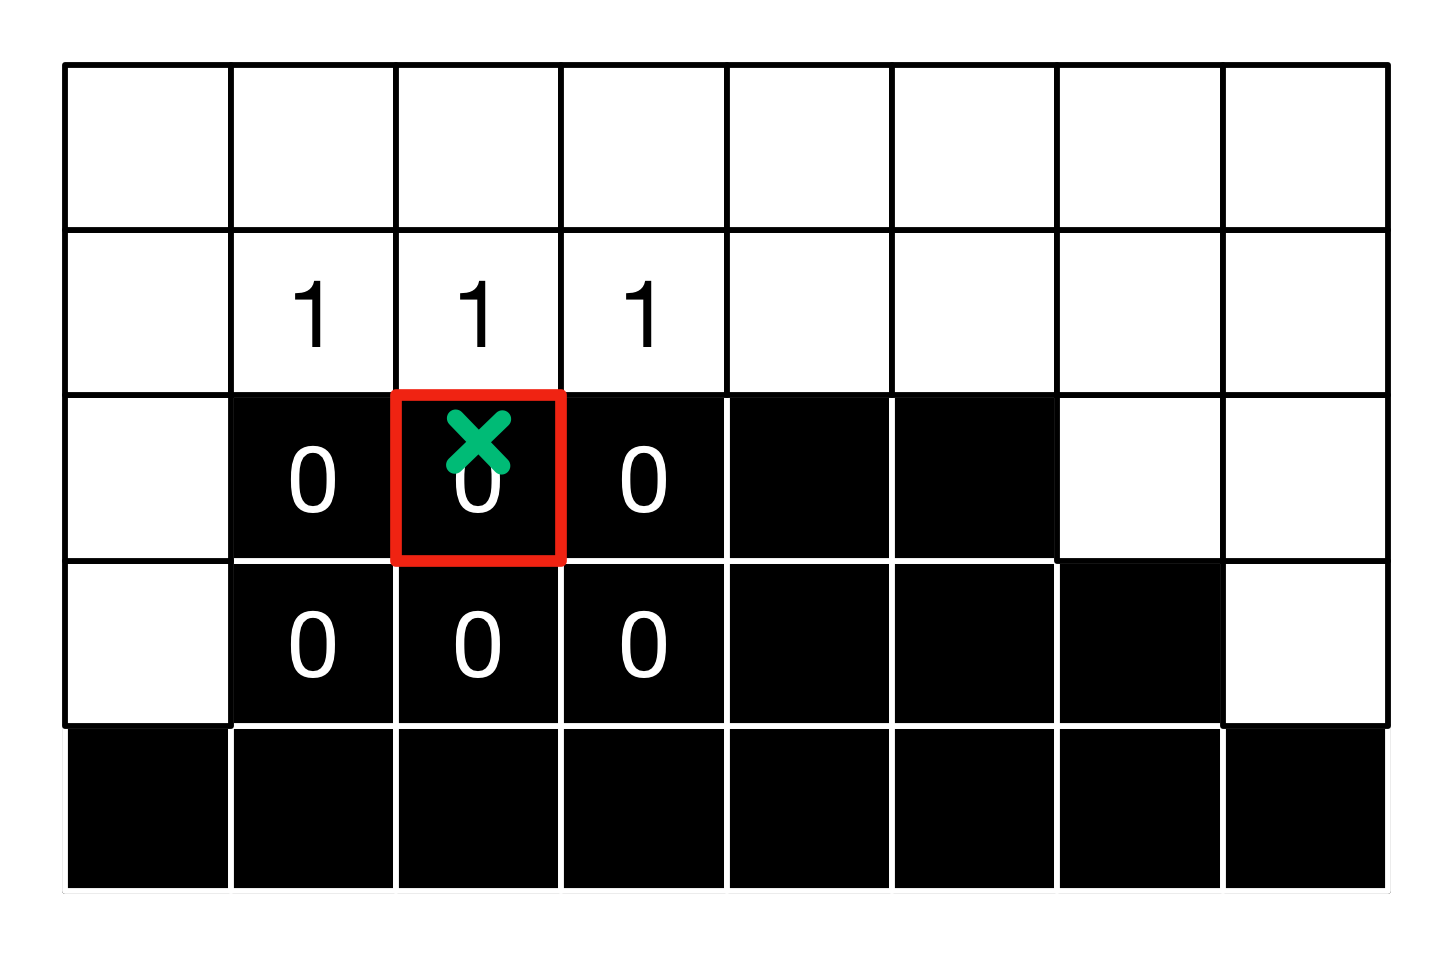
I will use the image below as a simple example: black and white, 8x5 pixels grid, clamped to its edges[5]; we will focus on the red outlined pixel.

Detecting where to apply AA
First, edges need to be detected: to do this, the lumas at the current fragment and at its four direct neighbors are computed. The minimal and maximal lumas are extracted, and the difference between the two gives us a local contrast value. The contrast is strong along edges, as there is a brutal change of color. Thus if the contrast is lower than a threshold proportional to the maximal luma, no anti-aliasing will be performed. Furthermore in dark areas aliasing is less visible, and thus if the contrast is below an absolute threshold, we don't perform anti-aliasing either. In those cases, the color read from the texture at the current pixel is output.
vec3 colorCenter = texture(screenTexture,In.uv).rgb;

// Luma at the current fragment
float lumaCenter = rgb2luma(colorCenter);

// Luma at the four direct neighbours of the current fragment.
float lumaDown = rgb2luma(textureOffset(screenTexture,In.uv,ivec2(0,-1)).rgb);
float lumaUp = rgb2luma(textureOffset(screenTexture,In.uv,ivec2(0,1)).rgb);
float lumaLeft = rgb2luma(textureOffset(screenTexture,In.uv,ivec2(-1,0)).rgb);
float lumaRight = rgb2luma(textureOffset(screenTexture,In.uv,ivec2(1,0)).rgb);

// Find the maximum and minimum luma around the current fragment.
float lumaMin = min(lumaCenter,min(min(lumaDown,lumaUp),min(lumaLeft,lumaRight)));
float lumaMax = max(lumaCenter,max(max(lumaDown,lumaUp),max(lumaLeft,lumaRight)));

// Compute the delta.
float lumaRange = lumaMax - lumaMin;

// If the luma variation is lower that a threshold (or if we are in a really dark area), we are not on an edge, don't perform any AA.
if(lumaRange < max(EDGE_THRESHOLD_MIN,lumaMax*EDGE_THRESHOLD_MAX)){
    fragColor = colorCenter;
    return;
}
The recommanded values for the two all-caps constants are EDGE_THRESHOLD_MIN = 0.0312 and EDGE_THRESHOLD_MAX = 0.125.
For our example pixel, the minimum is 0, the maximum 1, thus the range is 1, and as we have 1.0 > max(1*0.125,0.0312), we will perform AA.
Estimating gradient and choosing edge direction
Then for each pixel detected as being part of an edge, we check if the edge is vertical or horizontal. For this, the central luma and the eight neighbors are used to compute a series of local deltas, both in horizontal and vertical directions using the following formulas:
horizontal:
|(upleft - left) - (left - downleft)| + 2 * |(up - center) - (center - down)| + |(upright - right) - (right - downright)|vertical:
|(upright - up) - (up - upleft)| + 2 * |(right - center) - (center - left)| + |(downright - down) - (down - downleft)|
The biggest of the two quantities will give the principal direction of the edge.
// Query the 4 remaining corners lumas.
float lumaDownLeft = rgb2luma(textureOffset(screenTexture,In.uv,ivec2(-1,-1)).rgb);
float lumaUpRight = rgb2luma(textureOffset(screenTexture,In.uv,ivec2(1,1)).rgb);
float lumaUpLeft = rgb2luma(textureOffset(screenTexture,In.uv,ivec2(-1,1)).rgb);
float lumaDownRight = rgb2luma(textureOffset(screenTexture,In.uv,ivec2(1,-1)).rgb);

// Combine the four edges lumas (using intermediary variables for future computations with the same values).
float lumaDownUp = lumaDown + lumaUp;
float lumaLeftRight = lumaLeft + lumaRight;

// Same for corners
float lumaLeftCorners = lumaDownLeft + lumaUpLeft;
float lumaDownCorners = lumaDownLeft + lumaDownRight;
float lumaRightCorners = lumaDownRight + lumaUpRight;
float lumaUpCorners = lumaUpRight + lumaUpLeft;

// Compute an estimation of the gradient along the horizontal and vertical axis.
float edgeHorizontal =  abs(-2.0 * lumaLeft + lumaLeftCorners)  + abs(-2.0 * lumaCenter + lumaDownUp ) * 2.0    + abs(-2.0 * lumaRight + lumaRightCorners);
float edgeVertical =    abs(-2.0 * lumaUp + lumaUpCorners)      + abs(-2.0 * lumaCenter + lumaLeftRight) * 2.0  + abs(-2.0 * lumaDown + lumaDownCorners);

// Is the local edge horizontal or vertical ?
bool isHorizontal = (edgeHorizontal >= edgeVertical);
For our example, we have:
- horizontal =
|-2*0+0+1| + 2*|-2*0+0+1| + |-2*0+1+0| = 4 - vertical =
|-2*0+0+0| + 2*|-2*1+1+1| + |-2*0+0+0| = 0
Thus the edge is horizontal.
Choosing edge orientation
The current pixel is not necessarily exactly on the edge. The next step is thus to determine in which orientation, orthogonal to the edge direction, is the real
edge border. The gradient on each side of the crrent pixel is computed, and where it is the steepest probably lies the edge border.
// Select the two neighboring texels lumas in the opposite direction to the local edge.
float luma1 = isHorizontal ? lumaDown : lumaLeft;
float luma2 = isHorizontal ? lumaUp : lumaRight;
// Compute gradients in this direction.
float gradient1 = luma1 - lumaCenter;
float gradient2 = luma2 - lumaCenter;

// Which direction is the steepest ?
bool is1Steepest = abs(gradient1) >= abs(gradient2);

// Gradient in the corresponding direction, normalized.
float gradientScaled = 0.25*max(abs(gradient1),abs(gradient2));
For our example, we have gradient1 = 0 - 0 = 0 and gradient2 = 1 - 0 = 1, thus the variation is stronger towards the up neighbor, and gradientScaled = 0.25.
Finally, we move by half a pixel in this direction, and compute the average luma at this point.
// Choose the step size (one pixel) according to the edge direction.
float stepLength = isHorizontal ? inverseScreenSize.y : inverseScreenSize.x;

// Average luma in the correct direction.
float lumaLocalAverage = 0.0;

if(is1Steepest){
    // Switch the direction
    stepLength = - stepLength;
    lumaLocalAverage = 0.5*(luma1 + lumaCenter);
} else {
    lumaLocalAverage = 0.5*(luma2 + lumaCenter);
}

// Shift UV in the correct direction by half a pixel.
vec2 currentUv = In.uv;
if(isHorizontal){
    currentUv.y += stepLength * 0.5;
} else {
    currentUv.x += stepLength * 0.5;
}
For our pixel, the average local luma is 0.5*(1+0) = 0.5, and the 0.5 offset is applied positively along the Y axis.

First iteration exploration
The next step is exploration along the main axis of the edge. We step one pixel in both directions, query the lumas at the new coordinates, compute the variation of luma with respect to the average luma from the previous step. If this variation is greater than the local gradient, we have reached the end of the edge in this direction and stop. Else, keep increasing the UV offset by one pixel.
// Compute offset (for each iteration step) in the right direction.
vec2 offset = isHorizontal ? vec2(inverseScreenSize.x,0.0) : vec2(0.0,inverseScreenSize.y);
// Compute UVs to explore on each side of the edge, orthogonally. The QUALITY allows us to step faster.
vec2 uv1 = currentUv - offset;
vec2 uv2 = currentUv + offset;

// Read the lumas at both current extremities of the exploration segment, and compute the delta wrt to the local average luma.
float lumaEnd1 = rgb2luma(texture(screenTexture,uv1).rgb);
float lumaEnd2 = rgb2luma(texture(screenTexture,uv2).rgb);
lumaEnd1 -= lumaLocalAverage;
lumaEnd2 -= lumaLocalAverage;

// If the luma deltas at the current extremities are larger than the local gradient, we have reached the side of the edge.
bool reached1 = abs(lumaEnd1) >= gradientScaled;
bool reached2 = abs(lumaEnd2) >= gradientScaled;
bool reachedBoth = reached1 && reached2;

// If the side is not reached, we continue to explore in this direction.
if(!reached1){
    uv1 -= offset;
}
if(!reached2){
    uv2 += offset;
}
In the example, we get lumaEnd1 = 0.5 - 0.5 = lumaEnd2 = 0.0 < gradientScaled (the luma is 0.5 because of the bilinear interpolation when reading in the texture), thus we iterate on both sides.

Iterating
We keep iterating until both extremities of the edge are reached, or until the maximum number of iterations (12) is reached. To speed things up, we start stepping by an increasing amount of pixels QUALITY(i) after the fifth iteration : 1.5, 2.0, 2.0, 2.0, 2.0, 4.0, 8.0.
// If both sides have not been reached, continue to explore.
if(!reachedBoth){

    for(int i = 2; i < ITERATIONS; i++){
        // If needed, read luma in 1st direction, compute delta.
        if(!reached1){
            lumaEnd1 = rgb2luma(texture(screenTexture, uv1).rgb);
            lumaEnd1 = lumaEnd1 - lumaLocalAverage;
        }
        // If needed, read luma in opposite direction, compute delta.
        if(!reached2){
            lumaEnd2 = rgb2luma(texture(screenTexture, uv2).rgb);
            lumaEnd2 = lumaEnd2 - lumaLocalAverage;
        }
        // If the luma deltas at the current extremities is larger than the local gradient, we have reached the side of the edge.
        reached1 = abs(lumaEnd1) >= gradientScaled;
        reached2 = abs(lumaEnd2) >= gradientScaled;
        reachedBoth = reached1 && reached2;

        // If the side is not reached, we continue to explore in this direction, with a variable quality.
        if(!reached1){
            uv1 -= offset * QUALITY(i);
        }
        if(!reached2){
            uv2 += offset * QUALITY(i);
        }

        // If both sides have been reached, stop the exploration.
        if(reachedBoth){ break;}
    }
}
In the best case, lumaEnd1 and lumaEnd2 now contain the delta between the lumas at the edges extremities and the local average luma, and uv1 and uv2 the corresponding UV coordinates.
In the example, we obtain lumaEnd1 = 1-0.5 = 0.5 >= gradientScaled, so we can stop exploring on the left. On the right, we have to iterate twice more to satisfy the condition.
Estimating offset
Next we compute the distance reached in each of the two directions, and find the closest extremity. The edge length is estimated, as is the ratio of the distance to the closest extremity over the edge length. This gives us a hint about wether the current pixel is in the middle of the edge, or near an extremity. The closer to an extremity, the bigger the UV offset applied at the end.
// Compute the distances to each extremity of the edge.
float distance1 = isHorizontal ? (In.uv.x - uv1.x) : (In.uv.y - uv1.y);
float distance2 = isHorizontal ? (uv2.x - In.uv.x) : (uv2.y - In.uv.y);

// In which direction is the extremity of the edge closer ?
bool isDirection1 = distance1 < distance2;
float distanceFinal = min(distance1, distance2);

// Length of the edge.
float edgeThickness = (distance1 + distance2);

// UV offset: read in the direction of the closest side of the edge.
float pixelOffset = - distanceFinal / edgeThickness + 0.5;
For the example pixel, we get distance1 = 2, distance2 = 4, thus the end of the edge is closer in the left direction (direction1) and we have pixelOffset = - 2 / 6 + 0.5 = 0.1666
There is an additional check to ensure that the luma variations observed at the extremities are coherent with the luma at the current pixel. Else we might have stepped too far, and we don't apply any offset.
// Is the luma at center smaller than the local average ?
bool isLumaCenterSmaller = lumaCenter < lumaLocalAverage;

// If the luma at center is smaller than at its neighbour, the delta luma at each end should be positive (same variation).
// (in the direction of the closer side of the edge.)
bool correctVariation = ((isDirection1 ? lumaEnd1 : lumaEnd2) < 0.0) != isLumaCenterSmaller;

// If the luma variation is incorrect, do not offset.
float finalOffset = correctVariation ? pixelOffset : 0.0;
For the pixel, the center luma is smaller, and as the end luma is not negative, we indeed have (0.5 < 0.0) != isLumaCenterSmaller and the offset computation is valid.
Subpixel antialiasing
An additional computational step allows us to handle sub-pixel aliasing, for instance when thin lines are aliased on screen. In those cases an average luma is computed over the 3x3 neighborhood. After substracting the central luma from it and dividing by the luma range from the first step, this gives a sub-pixel offset. The smaller the contrast difference between the average and the central values, compared to the range over the whole neighborhood, the more uniform the area is (ie no single pixel dots), and the smaller the offset. This offset is then refined, and we keep the bigger of the offsets from the previous step and this one.
// Sub-pixel shifting
// Full weighted average of the luma over the 3x3 neighborhood.
float lumaAverage = (1.0/12.0) * (2.0 * (lumaDownUp + lumaLeftRight) + lumaLeftCorners + lumaRightCorners);
// Ratio of the delta between the global average and the center luma, over the luma range in the 3x3 neighborhood.
float subPixelOffset1 = clamp(abs(lumaAverage - lumaCenter)/lumaRange,0.0,1.0);
float subPixelOffset2 = (-2.0 * subPixelOffset1 + 3.0) * subPixelOffset1 * subPixelOffset1;
// Compute a sub-pixel offset based on this delta.
float subPixelOffsetFinal = subPixelOffset2 * subPixelOffset2 * SUBPIXEL_QUALITY;

// Pick the biggest of the two offsets.
finalOffset = max(finalOffset,subPixelOffsetFinal);
where SUBPIXEL_QUALITY = 0.75.
In the example, lumaAverage = (1/12)(2*(1+0+0+0)+1+1+0+0) = 4/12 = 0.333, and subPixelOffset1 = 0.333-0.0/1.0 = 0.333, thus subPixelOffsetFinal = 0.75*((-2*0.333+3.0)*(0.3333)^2)^2 = 0.0503, and the maximum offset is 0.1666. Hence no subpixel aliasing is detected nor treated.
Final read
Finally, we offset the UV accordingly in the direction orthogonal to the edge and read one last time in the texture.
// Compute the final UV coordinates.
vec2 finalUv = In.uv;
if(isHorizontal){
    finalUv.y += finalOffset * stepLength;
} else {
    finalUv.x += finalOffset * stepLength;
}

// Read the color at the new UV coordinates, and use it.
vec3 finalColor = texture(screenTexture,finalUv).rgb;
fragColor = finalColor;
For the studied pixel this gives a intensity of 0.1666*1 + (1-0.1666)*0 ≈ 0.1666.
If we apply this method to all the pixels of our small image, we get the following values:

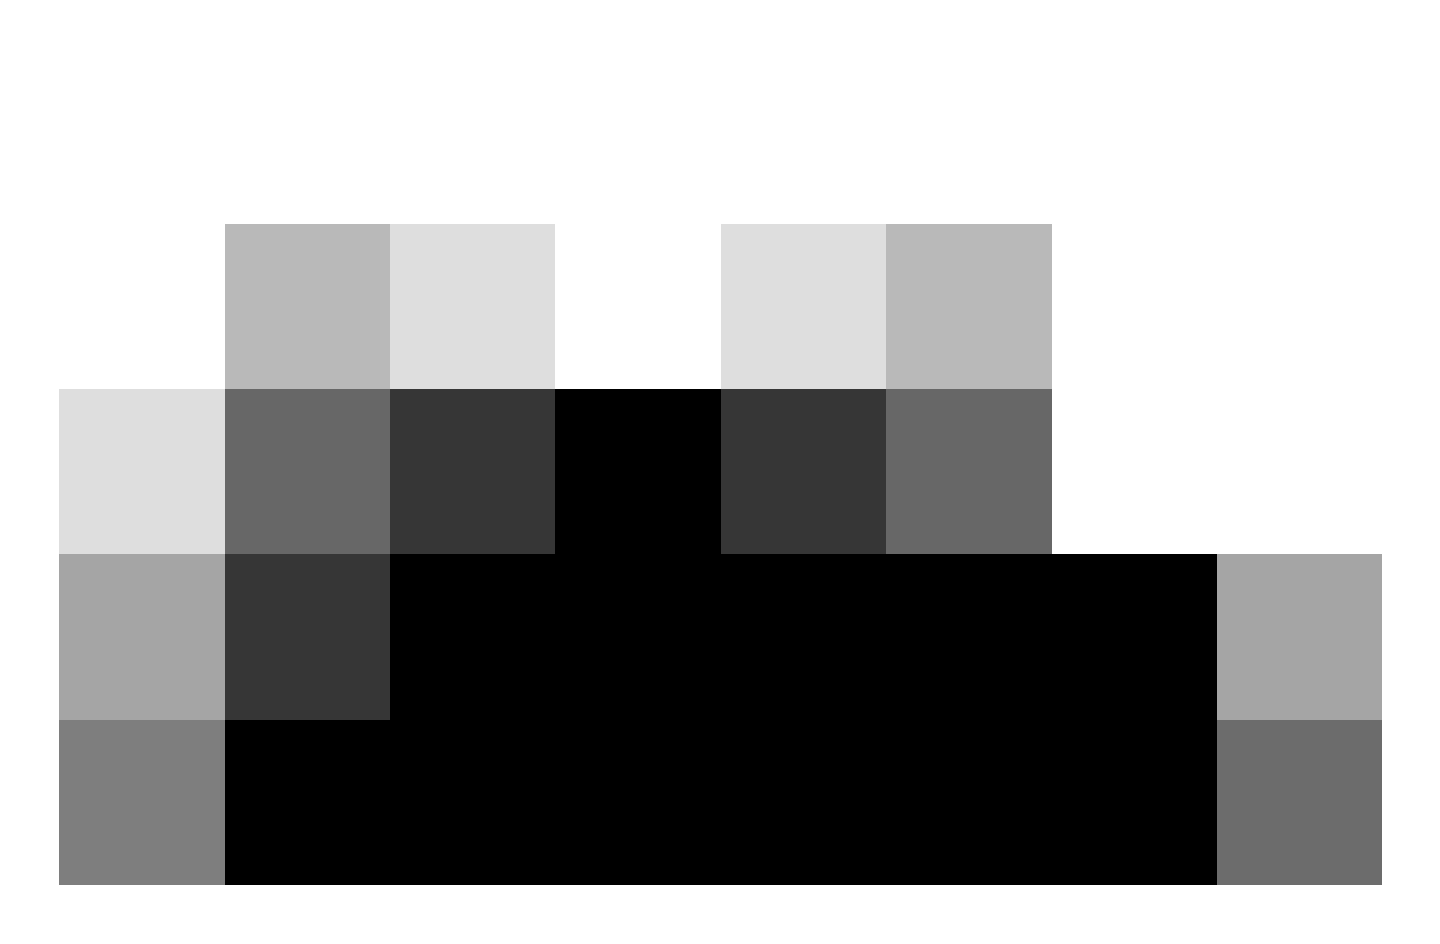
The pixels are smoothed depending on their proximity to the edges, and their position along those. As the example is simplistic, the results are hard to qualify. On more complex and well-defined images, the following anti-aliasing can be obtained: a soft but effective smothing of edges with minimal effects on texture details, and good temporal consistency. (no AA on the left, FXAA on the right, click on the pictures to better see the differences)


